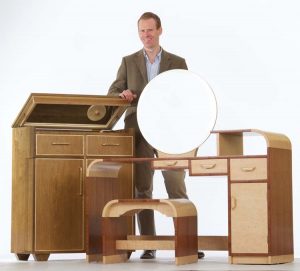
Garry Macfarlane describes how he made an Art Deco dressing table while a student at the Chippendale International School of Furniture in Scotland. We are grateful to Good Woodworking for publishing an earlier version of this feature.
In 2005, having graduated from university, a friend and I headed for Hawke’s Bay, one of the best known wine producing regions in New Zealand. Our aim was to sample as much of the red stuff as we could on a three day visit. However, we soon realised we had stumbled across another of New Zealand’s gems, the City of Napier.
After being devastated by a massive earthquake in 1931, the city was rebuilt during the 1930’s and the people chose the fashionable Art Deco style for their new buildings. Today you can walk round one of the finest collections of Art Deco buildings in the world.
I soon learned that the furniture produced in that period was even more exciting! The high standard of craftsmanship, the quality woods and veneers, the use of mirrors and glass, and the intricate shapes all contribute towards making it one of the most interesting periods of furniture design.
Arriving for my second term at the Chippendale International School of Furniture, we were informed that we were to make a piece of veneered furniture. Ideally, we should think our design almost impossible to make and take the opportunity to introduce challenging features like curves into the design. The idea was to enhance our learning experience as much as possible. It was a perfect opportunity to indulge my interest in Art Deco.
After careful consideration I decided to make a ladies dressing table as I thought I stood a good chance of selling this at the end of year student exhibition. I had seen a number of examples of Art Deco style dressing tables with their curved edges, oversized mirrors and beautiful veneers, allowing me to use many of the shapes that the style is renowned for.
Simple construction
The actual construction of the piece was relatively simple. I designed it in such a way that all the main flat or straight surfaces were cut from 18 mm thick plywood and pieced together using a domino machine. Apart from some careful marking out and Domino machine positioning, this part of the project presented few problems and it was pieced together in a couple of afternoons.
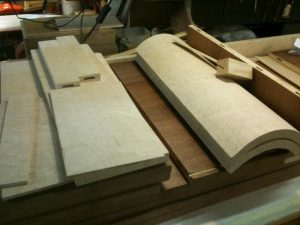
Along the bottom of the three pieces of ply that were to be the legs, I attached a 20mm strip of sycamore using PVA and some Japanese pegs for extra strength. I figured that if any part of the structure was going to suffer excess wear and tear it would be here, and the sycamore would be much tougher than the ply should the finished table get dragged around a floor.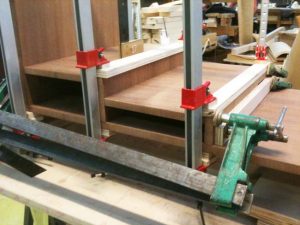
Curved and challenging
That left the two curved parts of the structure to make. To do this I made the former from chipboard reinforced with pine over which I attached a piece of bendy plywood to act as a skin. My first attempt at making the former in this way was not successful; while testing its strength in the vacuum press there was a loud crack as the chipboard imploded! My second attempt at the former was much stronger with extra pine reinforcement and a double skinned outer layer. Never underestimate the strength of a vacuum press!
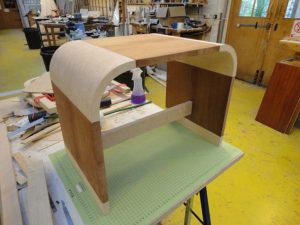
To make the curved sections, I used three 5 mm thick pieces of bendy ply and one 3 mm thick piece. These were laminated up using cascamite glue (chosen because it would hold the pieces together without any flex and its longer working time). Using PVA instead would have allowed too much movement in what was going to be important load-bearing parts and any weakness may have compromised the piece. The laminated pieces were positioned around the former and left in the vacuum press overnight to dry.
Once finished, they were cut to size using the table saw and fence, and attached to the rest of the piece using the domino machine. The main frame of the dressing table was now complete with only a few lips on the joints to sand down with some 80 grit on the orbital sander. Preparing all the parts for construction has taken very little time. The Domino machine had speeded up the construction process. Perhaps doing the curves first would have been wise as the biggest delay was waiting for the cascamite to dry!
Next up was the time-consuming veneering of all the plywood panels I had cut.
Veneering with fiddleback mahogany and birdseye maple
After some deliberation, I settled on using two contrasting veneers: fiddleback mahogany and birdseye maple. I hoped that once polish was applied to the finished piece, the underlying gold colour in both types of veneer would shine through and give that Art Deco feeling of luxury and opulence. 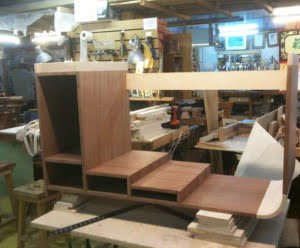
I started each panel by gluing cross banding along the edges. This was a slow and laborious task as each edge had to be filled if there were any gaps in the plywood, then sanded down and a layer of watered down PVA applied (about 50:50 mix). This ensured that there was a good surface for the cross banding to adhere to. Once the cross banding was applied, using PVA, this was allowed to dry and then trimmed down.
I am still unsure of the best method of trimming down the unwanted material without damaging the banding that is glued on. I tried sanding, cutting with a scalpel, using a newly sharpened pairing chisel and finally a flush plane. I found the flush plane very useful providing I kept good control of it, but a slip in the wrong direction could end up ripping off a section of banding. Towards the final panels I decided that the best solution was probably a mix of the scalpel for the major overlapping material, then the flush plane and lastly sanding with a block and some 180 grit paper. However, above all, using material with minimum overlap to start with was the biggest time saver. Easier said than done when you had a 1.3m edge to get banding on before the glue started setting!
With cross branding done, each panel was then placed in the veneer press to veneer the first side, before being trimmed and the second side veneered. In all, the panels took a serious amount of time. I was delighted with the final result but I would attempt to save time in future with more solid edging and less cross banding. Had this been a commission for a customer, the veneering process would certainly have resulted in a high price for the piece and probably made it unviable.
The curved pieces were far easier to veneer than expected, with the veneer press forming to their shape and the process being similar to the other straight pieces of ply. Trimming down the overlapping edges was easy too, on account of the birdseye maple being very easy to work with. I had expected the birdseye effect would make the veneer difficult to cut but it was a real pleasure to use – certainly more so than the fiddleback mahogany!
Glueing-up
I was now at a stage where I was able to glue up the table. The construction was complex (especially with so many dominos) and I had concerns about using the white glue given that the working time was only 10 minutes or so. The alternative was cascamite, allowing an hour or so of working time before starting to harden. That would give plenty of time to align all the parts up properly but the product is notoriously messy and might damage the veneers.
After careful thought, I worked out a way to glue up the piece in sections enabling me to use the white glue – a product I was far happier working with. By starting in the morning, I was able to get the table glued in a day by doing it in three sections. The curves provided something of a challenge as clamping onto a curve obviously provides no purchase to the clamp. This was solved by using a small G-clamp to secure blocks on either side of the curve. 120 grit sandpaper was glued onto these to stop them slipping once in position.
On balance I think that the correct decision was made in terms of using the PVA rather than the cascamite. Although the glue up was rushed and didn’t go 100% smoothly on every joint, I was pretty happy with the final result. Ideally a PVA with a longer working time (20 to 30 minutes) would have suited best. Were I to make this piece again, I would certainly do my research to find something more suitable.
Creating the mirror
With the basic structure of the dressing table now complete and most of the veneering done, I could now move on to the drawers and the mirror stand. The stand was made from solid sycamore with two pieces of wood being glued together before being shaped accordingly. The front, which would be clearly visible below the mirror, had a layer of birdseye maple veneer glued to it to match other parts of the piece. Having carefully chosen the sycamore, this blended very well with the veneer and the join between the solid and veneer was pretty much seamless and unnoticeable.
The mirror itself was to be round, so I cut a back board for it from 5mm plywood using the bandsaw and a circle jig. The front of this board would obviously have the mirror stuck to it (using mirror mastic) and I decided to veneer the back in the mahogany. The edge though was very unsightly, showing off the layers in the plywood and it was probably too thin to veneer with ease. The problem was solved by cutting a long, very thin strip of sycamore on the table saw. This was stuck to the edge of the backboard very carefully, using PVA and plenty of masking tape. The two ends were then spliced together and secured with a couple of Japanese pegs.
A slot was routed into the mirror stand to support the base of the backboard and a hook attached to the top to take the remainder of the weight. Finally the mirror was stuck to the front. The result was great and the mirror looked as good from the back as it did from the front, which meant that the table could sit in the middle of a room or a bay window.
Manufacturing the drawers and handles
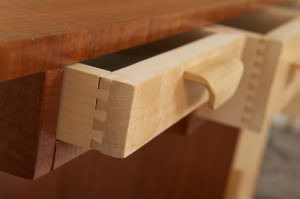
The next challenge was the drawers, and specifically the handles. A poor choice of ironmongery can let down what should be a fabulous piece of furniture. There are a plethora of online suppliers, but you never quite know what you are getting until it arrives on your doorstep. I was determined to avoid agonising over what to get and spending hours searching websites for the right item, and therefore decided to have a go at making the handles myself.
Like the mirror stand, the fronts of the drawers were to be solid sycamore with a layer of birdseye maple veneer on the front. I wanted the handles to match the veneer so as not to distract the eye from the great birdseye pattern. I decided on curved handles made out of laminated veneers and set about testing how this might be done. Eventually I settled on a former of 2×4 pine with a half inch curve along one edge cut using the table router. Over this were placed nine layers of veneer with birdseye maple top and bottom and sycamore in between. These were laminated using PVA and left in the press for three hours or so.
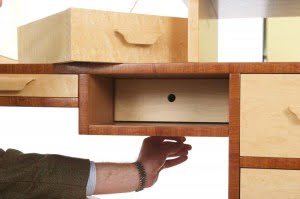
After being removed they were left clamped to the former for several days to ensure the shape was maintained while the glue cured fully. They were then cut to size and shaped using the bobbing sander and disc sander. Once sized, a slot was routed in the drawer fronts into which the handle was inserted and glued. The effect was for the veneer on the drawer front to truly stand out without a handle detracting from it and I was pleased with the result (although not with the amount of testing required to get it right)!
Finally, the drawers themselves were left to complete. The fronts were already made from solid sycamore and this was continued with the remainder of the carcass. The sides were dovetailed to the front, and a simple rebate at the back held the rear in place. The drawer bases were made from aromatic cedar to ensure the dressing table smelt of roses!
Finishing with shellac and lacquer
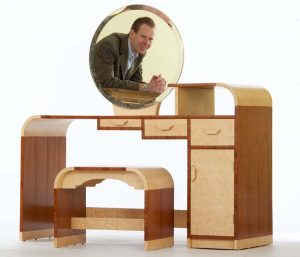
With construction complete all that remained was to apply a finish. While French polishing the piece would have looked great, I decided that this would simply not be practical if it were a table that would hopefully get everyday use. Instead I decided on a couple of coats of de-waxed shellac to bring out the colour and then a gloss water based lacquer. This ensured the piece both looked great but was also practical and had a hard wearing finish.
Reflections with red wine
So, to sum up, I was very pleased with what was finally produced, but it was not without its challenges and I certainly learnt a lot along the way. The veneering process is very time consuming, and unless you are well organised with a number of presses going at once (or have a client paying top rates) I think it would be difficult commercially to make money. Solid wood is certainly the way forward for me! The handles were great, but the amount of time these took to design and test is a hindrance. Laminating up curves was not as challenging as I first thought and I would happily consider this technique on future work as I think it can really make a piece stand out.
Lastly, the domino machine is a brilliant piece of kit! The joints it produces are strong, and the time taken to construct something massively sped up. I suspect it is not a tool for the purist, but for those trying to make a living from woodworking I think it is a fantastic tool.
So, with the piece finished it will now go into the end of year exhibition where hopefully it will sell. If it does, I will put my feet up and think about the next Art Deco style piece I’ll make, accompanied by a nice glass of Hawke’s Bay red, of course.
Garry Macfarlane has now set up Freckle Furniture in the Chippendale Incubation Centre to design and hand craft bespoke furniture and kitchens using a range of both traditional and modern techniques. You can read more on Garry’s website.